Nginx安装
版本区别
常用版本分为四大阵营
Linux配置
- 虚拟机:VMware workstation 16
- 操作系统:CentOS 7
配置网卡
查看IP
|
|
查看网卡配置文件:
|
|
若ONBOOT=no,则改成yes,开机自启动网卡,重启网络服务:
|
|
编译安装
- 打开Nginx开源版官网下载nginx安装包,并解压
|
|
- 进入解压后目录,编译安装与依赖检查
|
|
遇到错误
ERROR1
|
|
解决:安装GCC
|
|
ERROR2
|
|
解决:安装perl库
|
|
ERROR3
|
|
解决:安装zlib库
|
|
启动Nginx
进入安装好的目录 /usr/local/nginx/sbin
启动:
|
|
关闭防火墙:
|
|
禁止防火墙开机启动:
|
|
查看IP:
|
|
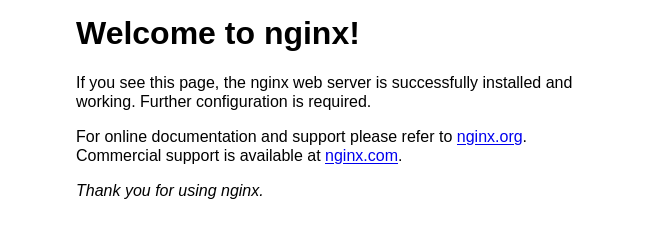
可以在虚拟机浏览器访问本地环回地址127.0.0.1,也可以在宿主机浏览器访问虚拟机IP,看到Nginx的欢迎页面:
快速停止:
|
|
优雅关闭,在退出前完成已经接受的连接请求:
|
|
重新加载配置:
|
|
将nginx安装成系统服务
|
|
脚本内容
|
|
重新加载系统服务:
|
|
以后就可以使用systemctl命令来启动nginx了
查看当前进程:
|
|
关闭之前启动的nginx进程:
|
|
启动nginx:
|
|
查看nginx服务状态:
|
|
设置nginx开机自启:
|
|
重启机器:
|
|
Nginx基础使用
目录结构
进入Nginx的主目录我们可以看到这些文件夹
- client_body_temp
- conf:用来存放配置文件相关
- fastcgi_temp
- html:用来存放静态文件的默认目录 html、css等
- logs:存放日志文件
- proxy_temp
- sbin:nginx的主程序(二进制启动文件)
- scgi_temp
- uwsgi_temp
其中后缀名为_temp的文件夹是用来存放运行过程中的临时文件
运行原理
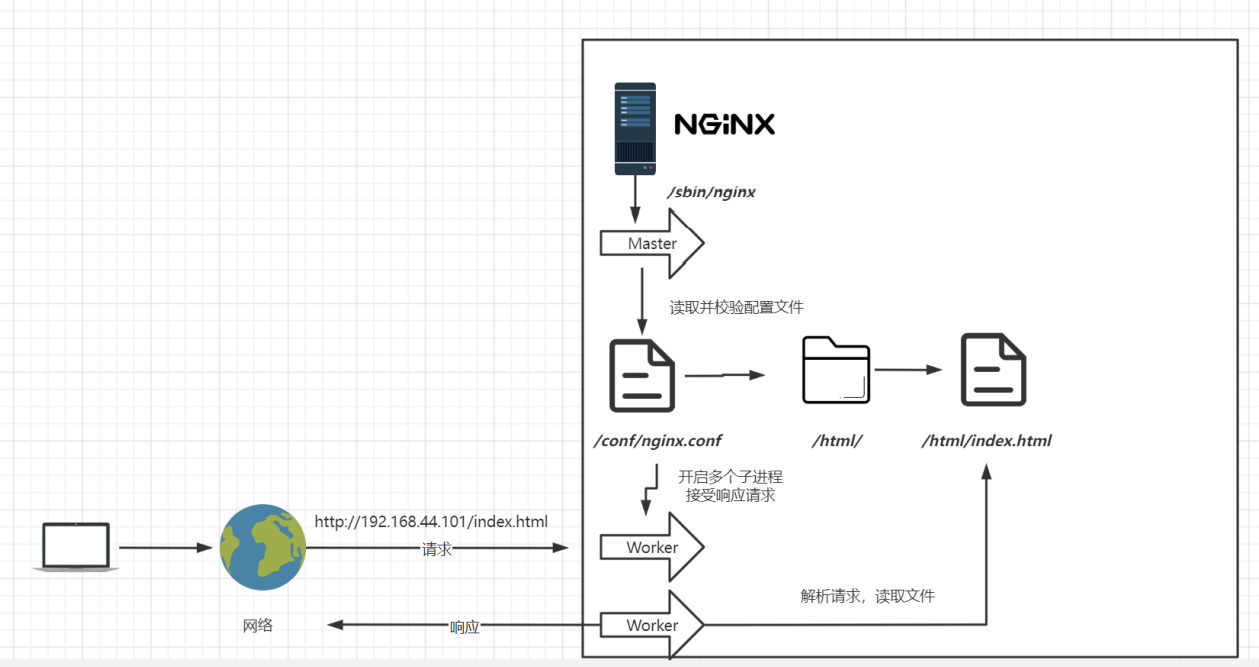
- Master是主进程,Worker是子进程
配置文件
打开nginx.conf:
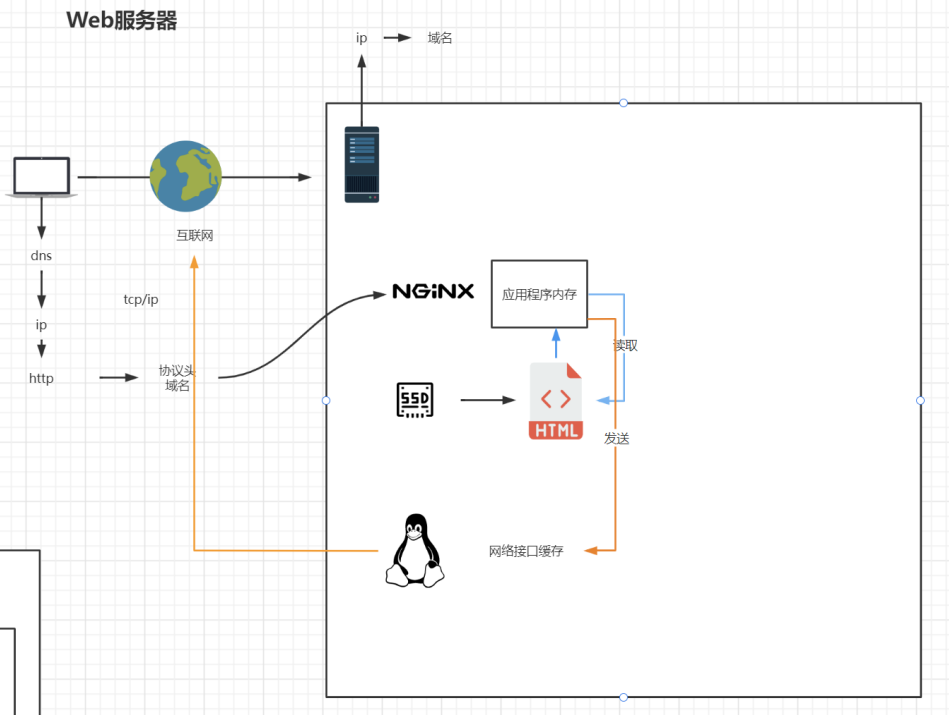
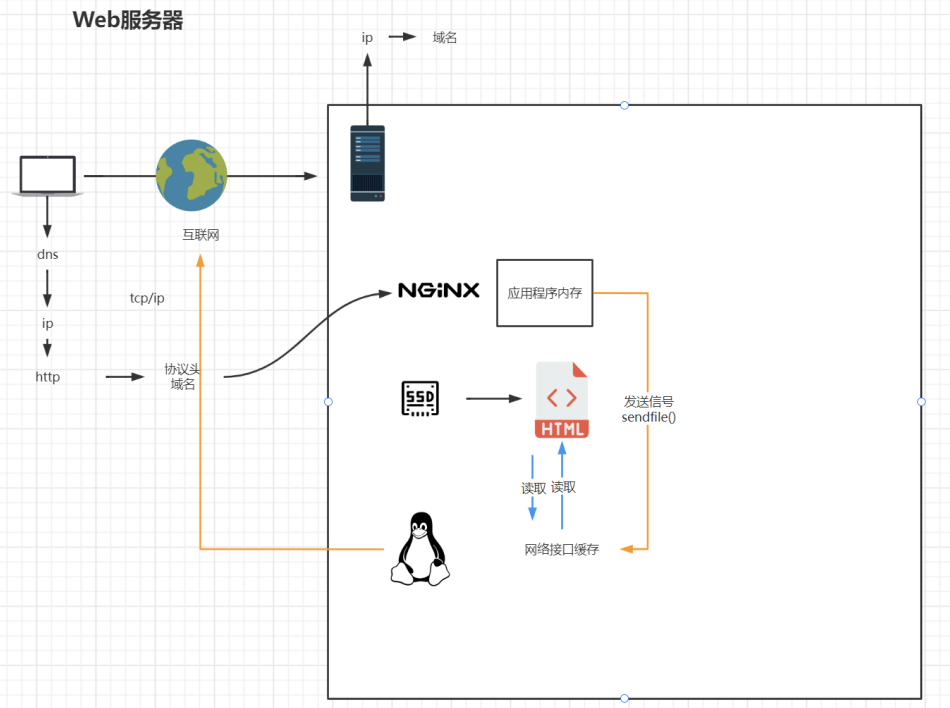
worker_processes 1;:默认为1,表示开启一个业务进程,一般设置为与内核数一致worker_connections 1024;:单个业务进程可接受连接数include mime.types;:引入http mime类型,告诉浏览器响应的数据类型,方便浏览器解析服务器的响应数据default_type application/octet-stream;:如果mime类型没匹配上,默认使用二进制流的方式传输。sendfile on;: 使用linux的 sendfile(socket, file, len) 高效网络传输,也就是数据0拷贝。
未开启sendfile:
开启sendfile:
keepalive_timeout 65;:心跳机制
虚拟主机

原本一台服务器只能对应一个站点,通过虚拟主机技术可以虚拟化成多个站点在同一物理主机上同时对外提供服务
虚拟主机技术在nginx中的具体实现可以通过在nginx.conf文件中定义多个server:
|
|
servername匹配规则
我们需要注意的是servername匹配分先后顺序,写在前面的匹配上就不会继续往下匹配了。
- 完整匹配
我们可以在同一servername中匹配多个域名:
|
|
- 通配符匹配
|
|
- 通配符结束匹配
|
|
- 正则匹配
|
|
反向代理
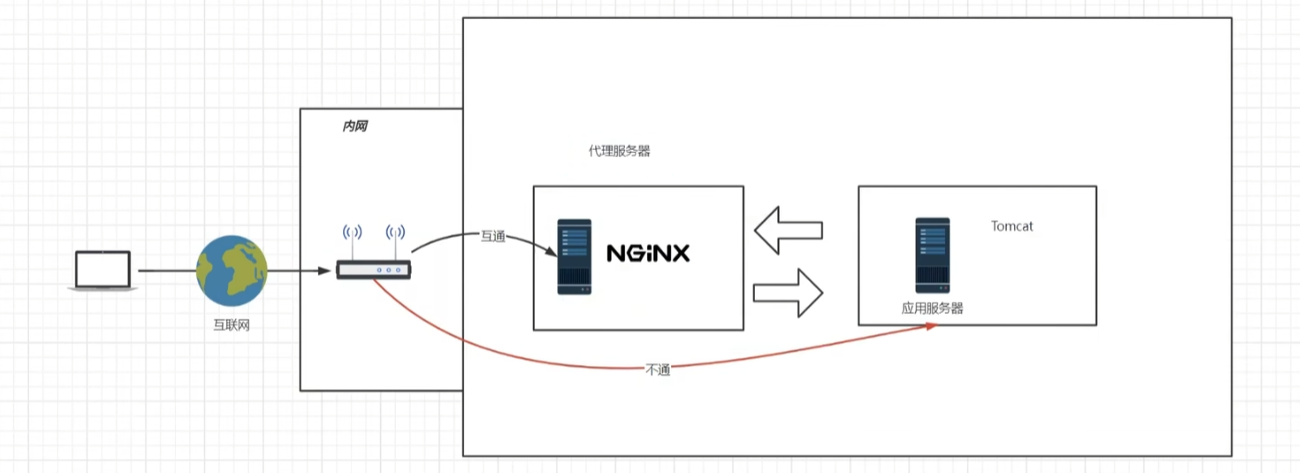
反向代理(Reverse Proxy)方式是指以代理服务器来接受internet上的连接请求,然后将请求转发给内部网络上的服务器,并将从服务器上得到的结果返回给internet上请求连接的客户端,此时代理服务器对外就表现为一个反向代理服务器。
反向代理服务器架设在服务器端,通过缓冲经常被请求的页面来缓解服务器的工作量。
反向代理中,外部网络对于内部网络具体的情况是不可见的,而代理服务器来代理内部网络来返回所要的数据(当然静态文件可以放在Nginx,这个静动分离再说),客户端不知道内部网络上的服务器的实际地址,而服务端知道客户端请求的来源以及数据。反向代理代理的是服务端 。
正向代理

正向代理是一个位于客户端和原始服务器(origin server)之间的服务器,为了从原始服务器取得内容,客户端向代理发送一个请求并指定目标(原始服务器),然后代理向原始服务器转交请求并将获得的内容返回给客户端。客户端才能使用正向代理。
正向代理,架设在客户机与目标主机之间,只用于代理内部网络对Internet的连接请求,客户机必须指定代理服务器,并将本来要直接发送到Web服务器上的http请求发送到代理服务器中。
正向代理是客户端知道目的服务器在哪里,然后通过代理服务器去访问客户端不能直接访问的目标服务器,而目标服务器并不知道客户端通过什么来访问的。 即正向代理代理的是客户端 。
配置反向代理
|
|
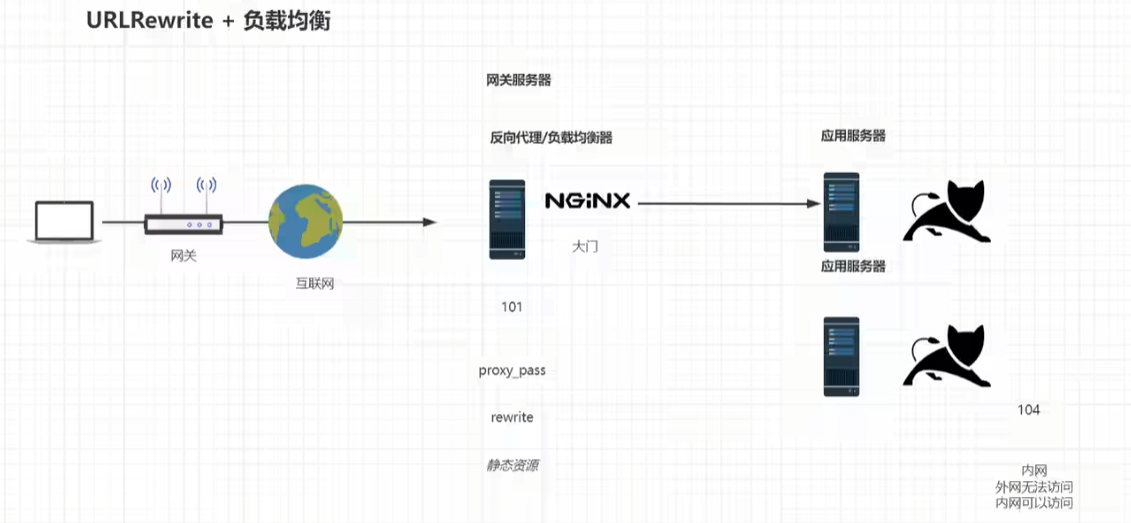
基于反向代理的负载均衡
|
|
负载均衡策略
- 轮询:默认情况下使用轮询方式,逐一转发,这种方式适用于无状态请求。
- weight(权重):指定轮询几率,weight和访问比率成正比,用于后端服务器性能不均的情况。
|
|
- down:表示当前的server暂时不参与负载
- weight:默认为1.weight越大,负载的权重就越大。
- backup: 其它所有的非backup机器down或者忙的时候,请求backup机器。
下面这几个策略实际生产环境中很少使用:
- ip_hash:根据客户端的ip地址转发同一台服务器,可以保持回话。
- least_conn:最少连接访问
- url_hash:根据用户访问的url定向转发请求
- fair:根据后端服务器响应时间转发请求
动静分离
localtion前缀类型:
/通用匹配,任何请求都会匹配到。=精准匹配,不是以指定模式开头~正则匹配,区分大小写~*正则匹配,不区分大小写^~非正则匹配,匹配以指定模式开头的location
location匹配顺序:
- 多个正则location直接按书写顺序匹配,成功后就不会继续往后面匹配
- 普通(非正则)location会一直往下,直到找到匹配度最高的(最大前缀匹配)
- 当普通location与正则location同时存在,如果正则匹配成功,则不会再执行普通匹配
- 所有类型location存在时,“=”匹配 > “^~”匹配 > 正则匹配 > 普通(最大前缀匹配)
|
|
alias与root
|
|
root用来设置根目录,而alias在接受请求的时候在路径上不会加上location。
- alias指定的目录是准确的,即location匹配访问的path目录下的文件直接是在alias目录下查找的;
- root指定的目录是location匹配访问的path目录的上一级目录,这个path目录一定要是真实存在root指定目录下的;
- 使用 alias标签的目录块中不能使用rewrite的break(具体原因不明);另外,alias指定的目录后面必须要加上"/“符号!!
- alias虚拟目录配置中,location匹配的path目录如果后面不带”/",那么访问的url地址中这个path目录后面加不加"/“不影响访问,访问时它会自动加上”/"; 但是如果location匹配的path目录后面加上"/",那么访问的url地址中这个path目录必须要加上"/",访问时它不会自动加上"/"。如果不加上"/",访问就会失败!
- root目录配置中,location匹配的path目录后面带不带"/",都不会影响访问。
UrlRewrite
rewrite是实现URL重写的关键指令,根据regex (正则表达式)部分内容, 重定向到replacement替代内容,结尾是flag标记。格式如下:
|
|
- 关键字:其中关键字error_log不能改变
- 正则:perl兼容正则表达式语句进行规则匹配
- 替代内容:将正则匹配的内容替换成replacement
- flag标记:rewrite支持的flag标记
rewrite参数的标签段位置: server,location,if
flag标记说明:
- last:本条规则匹配完成后,继续向下匹配新的location URI规则
- break:本条规则匹配完成即终止,不再匹配后面的任何规则
- redirect:返回302临时重定向,浏览器地址会显示跳转后的URL地址
- permanent:返回301永久重定向,浏览器地址栏会显示跳转后的URL地址
|
|
UrlRewrite + 负载均衡
nginx服务器作为服务器内网的网关
开启防火墙
|
|
重启防火墙
|
|
重载规则
|
|
查看已配置规则
|
|
指定端口和ip访问
|
|
移除规则
|
|
网关配置
|
|
防盗链配置
|
|
- none, 检测 http协议中的Referer 头域不存在的情况。
- blocked,检测 Referer 头域的值被防火墙或者代理服务器删除或伪装的情况。这种情况该头域的值不以 “http://” 或 “https://” 开头。
- server_names ,设置一个或多个 URL ,检测 Referer 头域的值是否是这些 URL 中的某一个。
在需要防盗链的location中配置:
|
|
使用curl测试:
|
|
带引用:
|
|
高可用配置
使用keepalived工具,当它启动后,可以检测所在机器的keepalived进程是否结束,若结束,则将IP转移到配置中的另一台权重较低的机器,从而保证一台Nginx服务器宕机后,自动使用另一台Nginx服务器
编译安装
使用./configure编译安装
如遇报错提示
|
|
安装依赖
|
|
yum安装
|
|
配置
使用yum安装后配置文件在:/etc/keepalived/keepalived.conf
第一台机器的keepalived配置文件:
|
|
第二台机器keepalived配置文件:
|
|
启动服务:
|
|
Nginx高级使用
Nginx高级使用内容不仅局限于Nginx自身功能讲解、配置、调 优,而且会由一个单一站点向高并发系统逐步演化,在演化的过程中以 Nginx为核心系统化讲解企业级高并发技术解决方案。
等以后接触到以Nginx为核心的高并发技术解决方案再继续学习:传送门