- 本篇主要是面向全栈开发的快速上手教程,需要具备Java及前端基础
- 主要内容:
- 开发工具:IDEA+VSCode
- 后端:SpringBoot+MyBatisPlus
- 前端:Vue+VueRouter+Vuex+ElementUI
- 接口调试:Swagger
- 数据模拟:MockJS
- 身份认证:JWT
- 后台管理:vue-admin-template
- 项目部署:阿里云ECS+Nginx+MySQL
开发环境配置
- 安装
JDK:https://www.oracle.com/cn/java/technologies/downloads/
- 安装
IDEA:https://www.jetbrains.com/zh-cn/idea/download/#section=windows
- 下载
Maven并解压:https://maven.apache.org/download.cgi
- 配置
Maven仓库:修改maven安装包中的conf/settings.xml文件,指定本地仓库位置,需要提前新建好repository目录
运行Maven的时候,Maven所需要的任何构件都是直接从本地仓库获取的。如果本地仓库没有,它会尝试从远程仓库下载构件至本地仓库。
1
|
<localRepository>D:\yi\tools\apache-maven-3.9.0-bin\repository</localRepository>
|
- 配置
Maven镜像:
1
2
3
4
5
6
7
8
|
<mirrors>
    <mirror>
        <id>aliyunmaven</id>
        <mirrorOf>*</mirrorOf>
        <name>阿里云公共仓库</name>
        <url>https://maven.aliyun.com/repository/public</url>
    </mirror>
</mirrors>
|
快速创建项目
- 利用IDEA提供的Spring Initializr创建SpringBoot应用
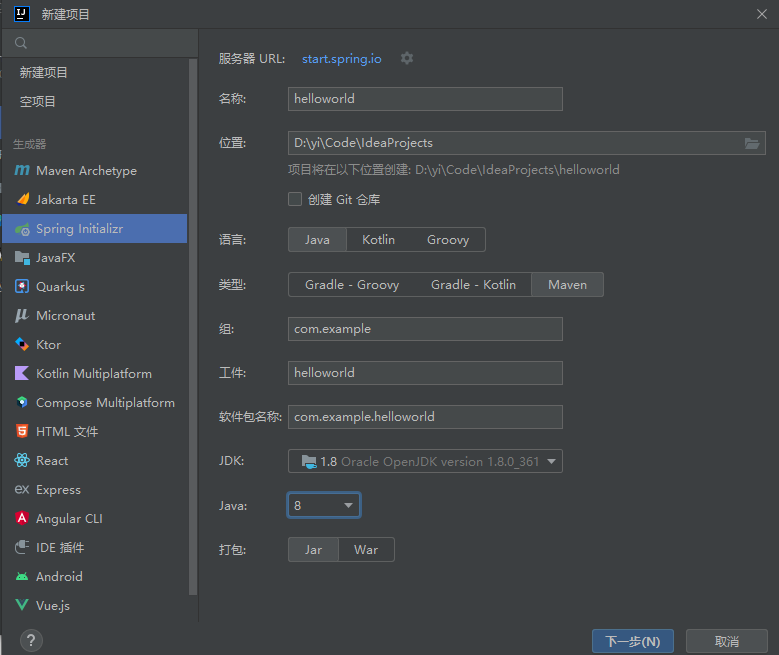
Group:一般输入公司域名,Artifact:项目名
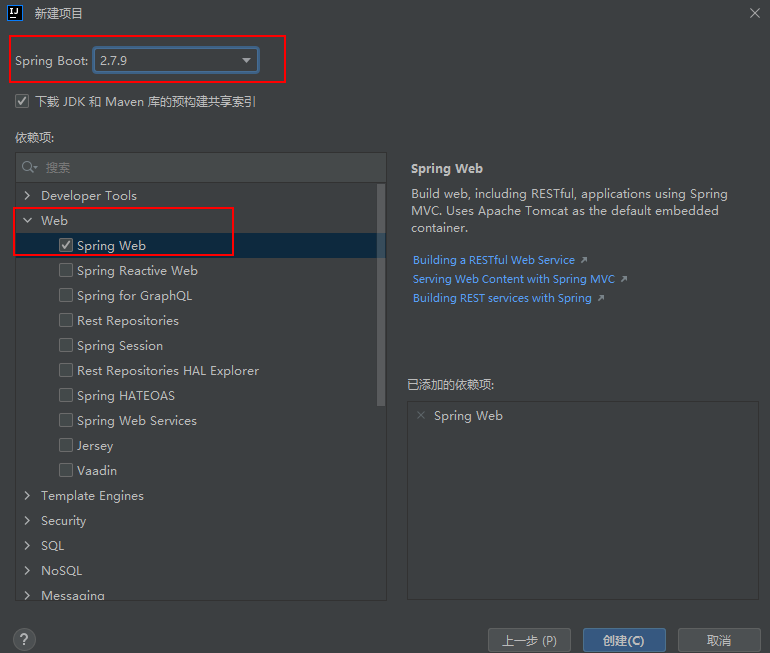
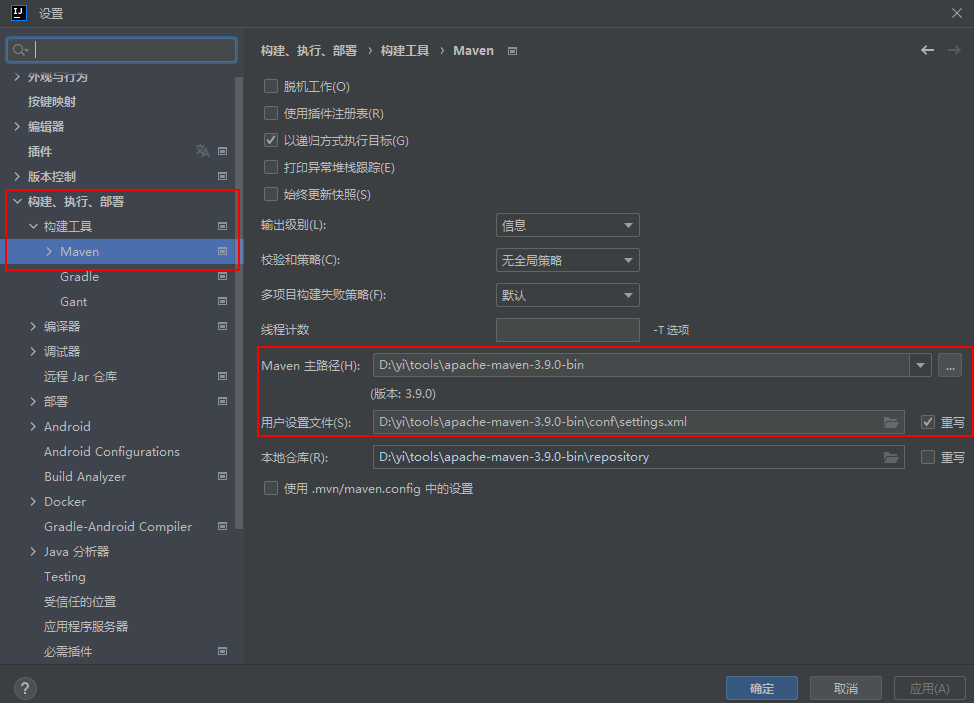
- 创建好项目后,进入设置
maven路径:
【关于报错】Maven:org.apache.maven.plugins:maven-site-plugin:3.x.x:可能是由于idea 下载依赖中断导致的报错。解决方法:
把下载不全的包删了,更新依赖重新下载就ok了。
【关于报错】找不到插件 ‘org.springframework.boot:spring-boot-maven-plugin:'。解决方法:添加版本号
helloworld
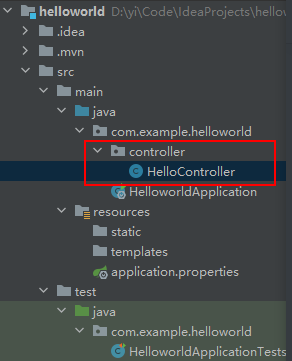
- 新建
controller包和HelloController类
- 写一个
Controller来接受浏览器的Get请求:
 1
 2
 3
 4
 5
 6
 7
 8
 9
10
11
12
13
|
package com.example.helloworld.controller;

import org.springframework.web.bind.annotation.GetMapping;
import org.springframework.web.bind.annotation.RestController;

@RestController
public class HelloController {
    //http://localhost:8080/hello
    @GetMapping("/hello")
    public String hello(){
        return "hello world";
    }
}
|
- 在
HelloworldApplication.java中启动项目,浏览器访问localhost:8080/hello,看到服务器响应信息:

热部署
- 在实际的项目开发调试过程中会频繁地修改后台类文件,导致需要重新编译、重新启动,整个过程非常麻烦,影响开发效率。
- Spring Boot提供了
spring-boot-devtools组件,使得无须手动重启Spring Boot应用即可重新编译、启动项目,大大缩短编译启动的时间。
devtools会监听classpath下的文件变动,触发Restart类加载器重新加载该类,从而实现类文件和属性文件的热部署。- 并不是所有的更改都需要重启应用(如静态资源、视图模板),可以通过设置
spring.devtools.restart.exclude属性来指定一些文件或目录的修改不用重启应用
配置方法
- 在
pom.xml配置文件中添加dev-tools依赖后,点击右上角小按钮M更新依赖。
1
2
3
4
5
|
<dependency>
    <groupId>org.springframework.boot</groupId>
    <artifactId>spring-boot-devtools</artifactId>
    <optional>true</optional>
</dependency>
|
使用optional=true表示依赖不会传递,即该项目依赖devtools;其他项目如 果引入此项目生成的JAR包,则不会包含devtools
- 在
application.properties中配置devtools:
1
2
3
4
|
# 热部署生效
spring.devtools.restart.enabled=true
# 设置重启目录
spring.devtools.restart.additional-paths=src/main/java
|
如果使用了Eclipse,那么在修改完代码并保存之后,项目将自动编译并触发重启,而如果使用了IntelliJ IDEA,还需要配置项目自动编译。
- 打开Settings页面,在左边的菜单栏依次找到
Build,Execution,Deployment→Compile,勾选Build project automatically
- 在
settings里找到Advansed Settings勾选Allow auto-make那个选项
- 做完这两步配置之后重启项目,若开发者再次在IntelliJ IDEA中修改代码,则项目会自动重启
系统配置
项目创建成功后会默认在resources目录下生成application.properties文件。 该文件包含Spring Boot项目的全局配置。
配置格式如下:
1
2
|
# 服务器端口配置
server.port=8081
|
控制器&参数传递
web入门
- Spring Boot将传统Web开发的mvc、json、tomcat等框架整合,提供了
spring-boot-starter-web组件,简化了Web应用配置。
- 创建SpringBoot项目勾选
Spring Web选项后,会自动将spring-boot-starter-web组件加入到项目中。
spring-boot-starter-web启动器主要包括web、webmvc、json、tomcat等基础依赖组件,作用是提供Web开发场景所需的所有底层依赖。webmvc为Web开发的基础框架,json为JSON数据解析组件,tomcat为自带的容器依赖。
控制器
Spring Boot提供了@Controller和@RestController两种注解来标识此类负责接收和处理HTTP请求。
- 如果请求的是页面和数据,使用
@Controller注解即可;
- 如果只是请求数据, 则可以使用
@RestController注解。
@Controller的用法
适用于前后端不分离的项目
1
2
3
4
5
6
7
8
|
@Controller
public class HelloController{
    @RequestMapping("/hello")
    public String index(ModelMap map){
        map.addAttribute("name","zhangsan");
        return "hello";
    }
}
|
- 示例中返回了
hello页面和name的数据,在前端页面中可以通过${name}参数获取后台返回的数据并显示。
@Controller通常与Thymeleaf模板引擎结合使用。
@RestController的用法
适用于前后端分离的项目
 1
 2
 3
 4
 5
 6
 7
 8
 9
10
|
@RestController
public class HelloController {
    @RequestMapping("/user")
    public User getUser(){
        User user = new User();
        user.getUsername("zhangsan");
        user.setPassword("123");
        return user;
    }
}
|
默认情况下,@RestController注解会将返回的对象数据转换为JSON格式。
路由映射
@RequestMapping注解主要负责URL的路由映射。它可以添加在Controller类或者具体的方法上。- 如果添加在
Controller类上,则这个Controller中的所有路由映射都将会加上此映射规则,如果添加在方法上,则只对当前方法生效。
@RequestMapping注解包含很多属性参数来定义HTTP的请求映射规则。常用的属性参数如下:
value: 请求URL的路径,支持URL模板、正则表达式method: HTTP请求方法consumes: 请求的媒体类型(Content-Type),如application/jsonproduces: 响应的媒体类型params,headers: 请求的参数及请求头的值
@RequestMapping的value属性用于匹配URL映射,value支持简单表达式@RequestMapping("/user")@RequestMapping支持使用通配符匹配URL,用于统一映射某些URL规则类似的请求:@RequestMapping("/getJson/*.json"),当在浏览器中请求/getJson/a.json或者/getJson/b.json时都会匹配到后台的Json方法@RequestMapping的通配符匹配非常简单实用,支持*、?、**等通配符- 符号
*匹配任意字符,符号**匹配任意路径,符号?匹配单个字符。
- 有通配符的优先级低于没有通配符的,比如
/user/add.json比/user/*.json优先匹配。
- 有
**通配符的优先级低于有*通配符的。
Method匹配
- HTTP请求Method有GET、POST、PUT、DELETE等方式。HTTP支持的全部 Method
@RequestMapping注解提供了method参数指定请求的Method类型,包括RequestMethod.GET、RequestMethod.POST、RequestMethod.DELETE、RequestMethod.PUT等值,分别对应HTTP请求的Method
1
2
3
4
|
@RequestMapping(value="/getData",method=RequestMethod.Get)
public String getData(){
    return "hello";
}
|
- Method匹配也可以使用
@GetMapping、@PostMapping等注解代替。
参数传递
@RequestParam将请求参数绑定到控制器的方法参数上,接收的参数来自 HTTP请求体或请求url的QueryString,当请求的参数名称与Controller的业务方法参数名一致时,@RequestParam可以省略@PathVaraible:用来处理动态的URL,URL的值可以作为控制器中处理方法的参数@RequestBody接收的参数是来自requestBody中,即请求体。一般用于处理非Content-Type: application/x-www-form-urlencoded编码格式的数据,比如:application/json、application/xml等类型的数据
文件上传+拦截器
静态资源访问
适用于前后端不分离项目
- 使用IDEA创建Spring Boot项目,会默认创建出
classpath:/static/目录,静态资源一般放在这个目录下即可。
- 如果默认的静态资源过滤策略不能满足开发需求,也可以自定义静态资源过滤策略。
- 在
application.properties中直接定义过滤规则和静态资源位置:
1
2
|
spring.mvc.static-path-pattern=/static/**
spring.web.resources.static-location=classpath:/static/
|
- 过滤规则为
/static/**,静态资源位置为classpath:/static/
文件上传
- 表单的
enctype属性规定在发送到服务器之前应该如何对表单数据进行编码。
- 当表单的
enctype="application/x-www-form-urlencoded"(默认)时, form表单中的数据格式为:key=value&key=value
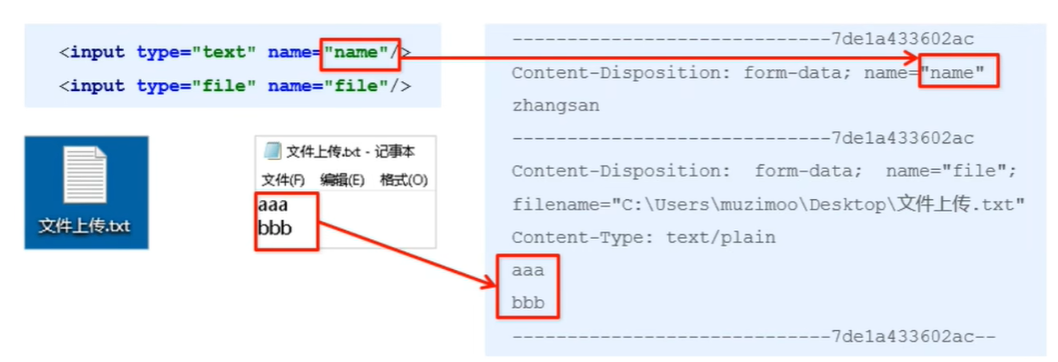
- 当表单的
enctype="multipart/form-data"时,其传输数据形式如下:
- Spring Boot工程嵌入的tomcat限制了请求的文件大小,每个文件的配置最大为1Mb,单次请求的文件的总数不能大于10Mb。
- 要更改这个默认值需要在配置文件(如
application.properties)中加入两个配置:
1
2
|
spring.servlet.multipart.max-file-size=10MB
spring.servlet.multipart.max-request-size=10MB
|
- 当表单的
enctype="multipart/form-data"时,可以使用MultipartFile获取上传的文件数据,再通过transferTo方法将其写入到磁盘中
拦截器
拦截器在Web系统中非常常见,对于某些全局统一的操作,我们可以把它提取到拦截器中实现。总结起来,拦截器大致有以下几种使用场景:
- 权限检查:如登录检测,进入处理程序检测是否登录,如果没有,则直接返回登录页面。
- 性能监控:有时系统在某段时间莫名其妙很慢,可以通过拦截器在进入处理程序之前记录开始时间,在处理完后记录结束时间,从而得到该请求的处理时间
- 通用行为:读取cookie得到用户信息并将用户对象放入请求,从而方便后续流程使用,还有提取Locale、Theme信息等,只要是多个处理程序都需要的,即可使用拦截器实现
- Spring Boot定义了
HandlerInterceptor接口来实现自定义拦截器的功能
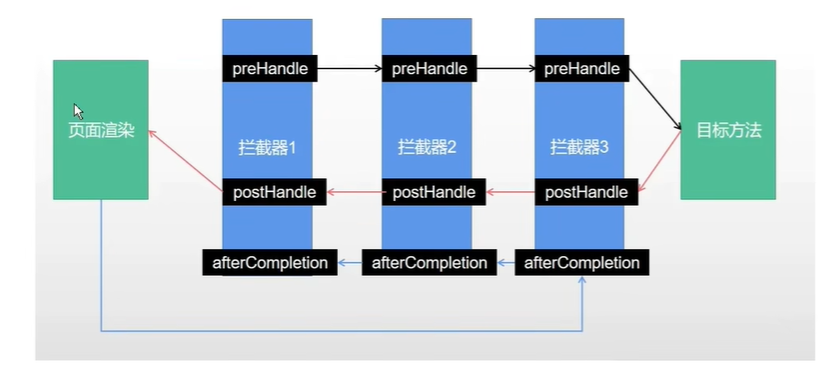
HandlerInterceptor接口定义了preHandle、postHandle、afterCompletion三种方法,通过重写这三种方法实现请求前、请求后等操作
定义
1
2
3
4
5
6
7
8
|
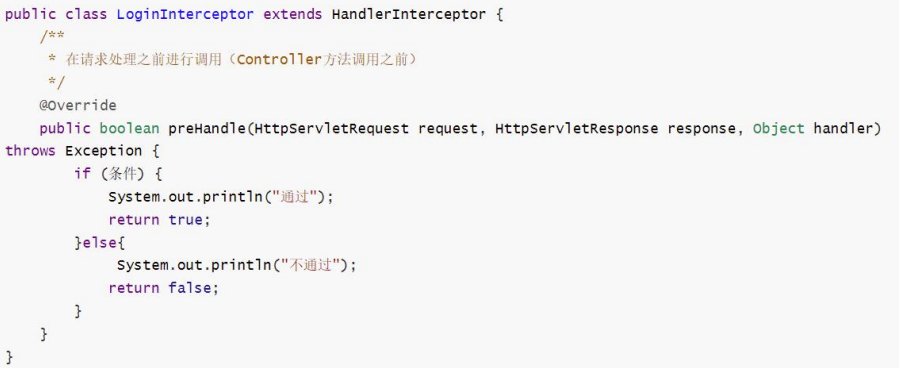
public class LoginInterceptor implements HandlerInterceptor {
    //在请求处理之前进行调用(Controller方法调用之前)
    @Override
    public boolean preHandle(HttpServletRequest request, HttpServletResponse response, Object handler) throws Exception {
        System.out.println("preHandle");
        return true;
    }
}
|
注册
addPathPatterns方法定义拦截的地址excludePathPatterns定义排除某些地址不被拦截- 添加的一个拦截器没有
addPathPattern任何一个url则默认拦截所有请求
- 如果没有
excludePathPatterns任何一个请求,则默认不放过任何一个请求。
1
2
3
4
5
6
7
|
@Configuration
public class Webconfig implements WebMvcConfigurer {
    @Override
    public void addInterceptors(InterceptorRegistry registry) {
        registry.addInterceptor(new LoginInterceptor()).addPathPatterns("/user/**");
    }
}
|
RESTful服务+Swagger
介绍
- RESTful是目前流行的互联网软件服务架构设计风格。
- REST(Representational State Transfer,表述性状态转移)一词是由Roy Thomas Fielding在2000年的博士论文中提出的,它定义了互联网软件服务的架构原则,如果一个架构符合REST原则,则称之为RESTful架构。
- REST并不是一个标准,它更像一组客户端和服务端交互时的架构理念和设计原则,基于这种架构理念和设计原则的Web API更加简洁,更有层次。
特点
- 每一个URI代表一种资源
- 客户端使用GET、POST、PUT、DELETE四种表示操作方式的动词对服务端资源进行操作:GET用于获取资源,POST用于新建资源(也可以用于更新资源),PUT用于更新资源,DELETE用于删除资源。
- 通过操作资源的表现形式来实现服务端请求操作。
- 资源的表现形式是JSON或者HTML。
- 客户端与服务端之间的交互在请求之间是无状态的,从客户端到服务端的每个请求都包含必需的信息。
- 符合RESTful规范的Web API需要具备如下两个关键特性:
- 安全性:安全的方法被期望不会产生任何副作用,当我们使用GET操作获取资源时,不会引起资源本身的改变,也不会引起服务器状态的改变。
- 幂等性:幂等的方法保证了重复进行一个请求和一次请求的效果相同(并不是指响应总是相同的,而是指服务器上资源的状态从第一次请求后就不再改变了),在数学上幂等性是指N次变换和一次变换相同
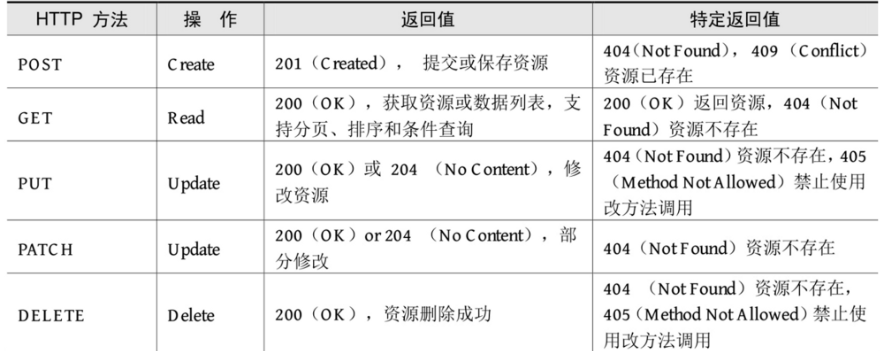
状态码分为以下5个类别:
- 1xx:信息,通信传输协议级信息
- 2xx:成功,表示客户端的请求已成功
- 3xx:重定向,表示客户端必须执行一些其他操作才能完成其请求
- 4xx:客户端错误,此类错误状态码指向客户端
- 5xx:服务器错误,服务器负责这写错误状态码
Spring Boot实现RESTful API
Spring Boot提供的spring-boot-starter-web组件完全支持开发RESTful API,提供了与REST操作方式(GET、POST、PUT、DELETE)对应的注解。
@GetMapping:处理GET请求,获取资源。@PostMapping:处理POST请求,新增资源。@PutMapping:处理PUT请求,更新资源。@DeleteMapping:处理DELETE请求,删除资源。@PatchMapping:处理PATCH请求,用于部分更新资源
在RESTful架构中,每个网址代表一种资源,所以URI中建议不要包含动词,只包含名词即可,而且所用的名词往往与数据库的表格名对应。
Swagger
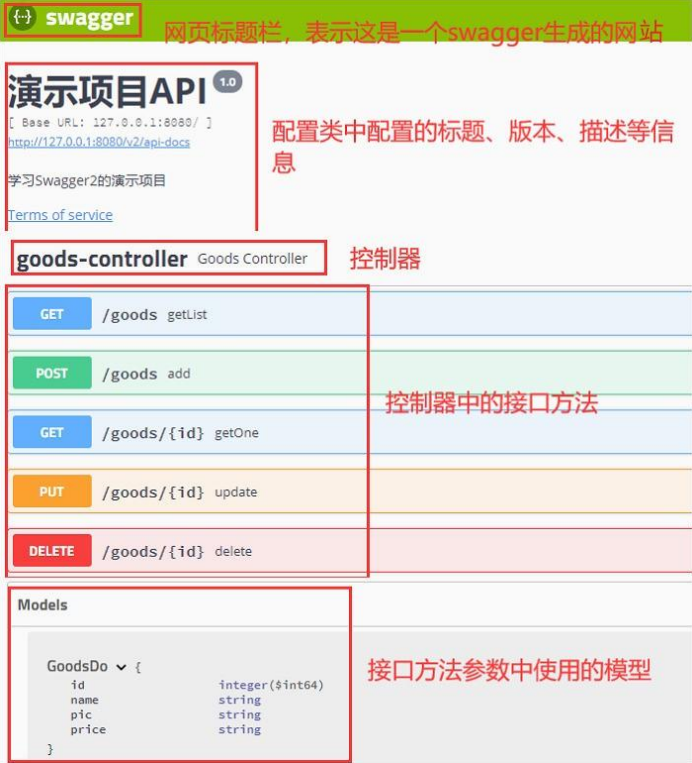
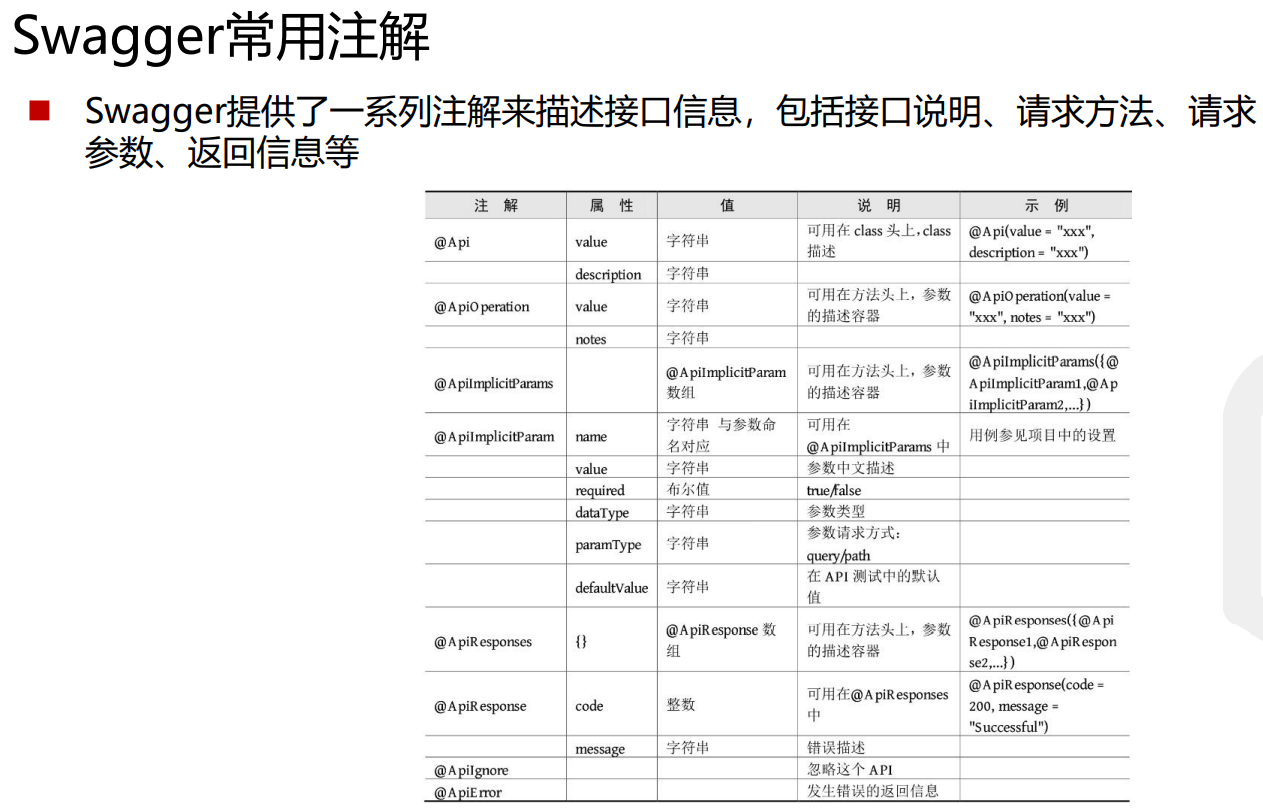
- Swagger是一个规范和完整的框架,用于生成、描述、调用和可视化RESTful风格的Web服务,是非常流行的API表达工具。
- Swagger能够自动生成完善的RESTful API文档,同时根据后台代码的修改同步更新,同时提供完整的测试页面来调试API
使用Swagger生成Web API文档
- 在Spring Boot项目中集成Swagger同样非常简单,只需在项目中引入 springfox-swagger2和springfox-swagger-ui依赖即可:
 1
 2
 3
 4
 5
 6
 7
 8
 9
10
11
|
<!-- Swagger -->
<dependency>
    <groupId>io.springfox</groupId>
    <artifactId>springfox-swagger2</artifactId>
    <version>2.9.2</version>
</dependency>
<dependency>
    <groupId>io.springfox</groupId>
    <artifactId>springfox-swagger-ui</artifactId>
    <version>2.9.2</version>
</dependency>
|
- 创建配置类
 1
 2
 3
 4
 5
 6
 7
 8
 9
10
11
12
13
14
15
16
17
18
19
20
21
22
23
24
25
26
27
28
29
30
31
32
33
34
|
@Controller
@EnableSwagger2
@EnableWebMvc
public class SwaggerConfig implements WebMvcConfigurer {
    @Override
    public void addResourceHandlers(ResourceHandlerRegistry registry) {

        registry.addResourceHandler("/**").addResourceLocations(
                "classpath:/static/");
        registry.addResourceHandler("swagger-ui.html").addResourceLocations(
                "classpath:/META-INF/resources/");
        registry.addResourceHandler("/webjars/**").addResourceLocations(
                "classpath:/META-INF/resources/webjars/");
        WebMvcConfigurer.super.addResourceHandlers(registry);
    }

    @Bean
    public Docket createRestApi() {
        return new Docket(DocumentationType.SWAGGER_2)
                .apiInfo(apiInfo())
                .select()
                // com包下所有API都交给Swagger2管理
                .apis(RequestHandlerSelectors.basePackage("com"))
                .paths(PathSelectors.any()).build();
    }

    ////  API文档页面显示信息
    private ApiInfo apiInfo() {
        return new ApiInfoBuilder()
                .title("演示项目")
                .description("学习")
                .build();
    }
}
|
注意:Spring Boot 2.6.X后与Swagger有版本冲突问题,需要在 application.properties中加入以下配置:spring.mvc.pathmatch.matching-strategy=ant_path_matcher
- 启动项目访问 http://127.0.0.1:8080/swagger-ui.html ,即可打开自动生成的可视化测试页面:
Swagger常用注解
MybatisPlus快速上手
介绍
ORM
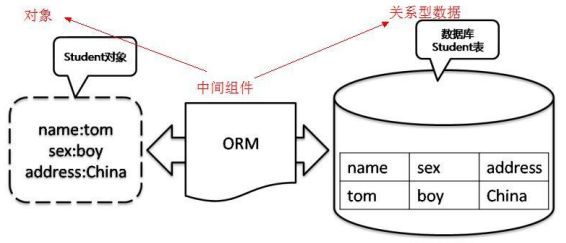
- ORM(Object Relational Mapping,对象关系映射)是为了解决面向对象与关系数据库存在的互不匹配现象的一种技术。
- ORM通过使用描述对象和数据库之间映射的元数据将程序中的对象自动持久化到关系数据库中。
- ORM框架的本质是简化编程中操作数据库的编码
MyBatis-Plus
- MyBatis是一款优秀的数据持久层ORM框架,被广泛地应用于应用系统。
- MyBatis能够非常灵活地实现动态SQL,可以使用XML或注解来配置和映射原生信息,能够轻松地将Java的POJO(Plain Ordinary Java Object,普通的Java对象)与数据库中的表和字段进行映射关联。
- MyBatis-Plus是一个 MyBatis 的增强工具,在 MyBatis 的基础上做了增强,简化了开发
Mybatis使用
- 添加依赖:
 1
 2
 3
 4
 5
 6
 7
 8
 9
10
11
12
13
14
15
16
17
18
|
<!-- MyBatisPlus依赖 -->
<dependency>
    <groupId>com.baomidou</groupId>
    <artifactId>mybatis-plus-boot-starter</artifactId>
    <version>3.4.2</version>
</dependency>
<!-- mysql驱动依赖 -->
<dependency>
    <groupId>mysql</groupId>
    <artifactId>mysql-connector-java</artifactId>
    <version>5.1.47</version>
</dependency>
<!-- 数据连接池 -->
<dependency>
    <groupId>com.alibaba</groupId>
    <artifactId>druid-spring-boot-starter</artifactId>
    <version>1.1.20</version>
</dependency>
|
- 全局配置,在
application.properties中配置据库数链接信息:
1
2
3
4
5
6
|
spring.datasource.type=com.alibaba.druid.pool.DruidDataSource
spring.datasource.driver-class-name=com.mysql.jdbc.Driver
spring.datasource.url=jdbc:mysql://localhost:3306/dbname?useSSL-false
spring.datasource.username=root
spring.datasource.password=root
mybatis-plus.configuration.log-impl=org.apache.ibatis.logging.stdout.StdOutImpl
|
- 创建User实体类,一定要有Getter、Setter方法
- 创建Mapper接口,实现动态SQL:
1
2
3
4
5
|
@Mapper
public interface UserMapper {
    @Select("select * from t_user")
    public List<User> find();
}
|
- 在controller中调用:
 1
 2
 3
 4
 5
 6
 7
 8
 9
10
11
12
|
@RestController
public class mapper {
    @Autowired
    UserMapper userMapper;

    @GetMapping("/m1")
    public String m1(){
        List<User> users = userMapper.find();
        System.out.println(users);
        return "yes";
    }
}
|
- 添加
@MapperScan注解

CRUD注解
CRUD操作
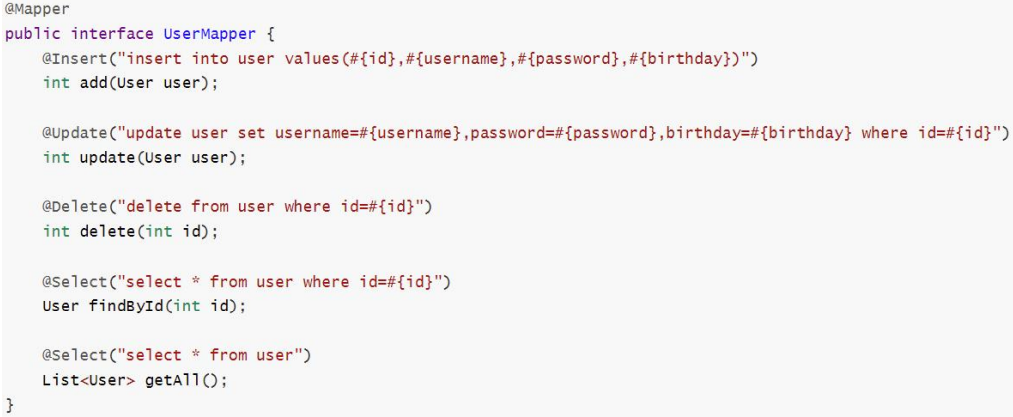
MybatisPlus使用
添加依赖,创建实体类都是一样的。
创建Mapper,只需要直接继承BaseMapper,便可拥有一些基础的操作。
1
2
|
@Mapper
public interface UserMapper extends BaseMapper<User> {}
|
MybatisPlus注解
@TableName:当表名与实体类名称不一致时,可以使用@TableName注解进行关联。@TableField:当表中字段名称与实体类属性不一致时,使用@TableField进行关联@TableId,用于标记表中的主键字段,MybatisPlus也提供了主键生成策略

Mybatis多表查询&分页查询
多表查询
MybatisPlus只是对单表查询进行增强,对多表查询没有增强。
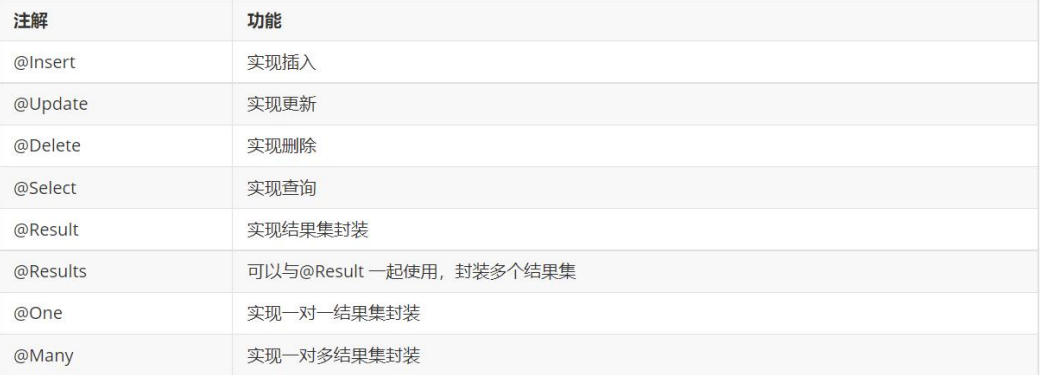
实现复杂关系映射,可以使用@Results注解,@Result注解,@One注解, @Many注解组合完成复杂关系的配置。
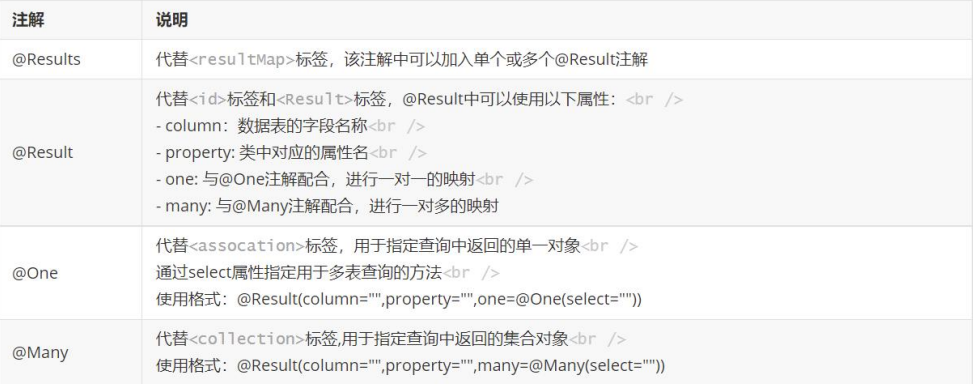
在查询用户时,顺便把所有订单查询出来。
- 在User中添加一个不存在的字段,用来进行数据库的映射,并添加对应的toString方法
 1
 2
 3
 4
 5
 6
 7
 8
 9
10
11
12
13
14
15
16
17
18
19
20
|
@TableField(exist = false)
private List<Order> orders;

public List<Order> getOrders() {
    return orders;
}

public void setOrders(List<Order> orders) {
    this.orders = orders;
}

@Override
public String toString() {
    return "User{" +
            "id=" + id +
            ", username='" + username + '\\'' +
            ", password='" + password + '\\'' +
            ", orders=" + orders +
            '}';
}
|
- 创建
OrderMapper
1
2
|
@Mapper
public interface OrderMapper extends BaseMapper<Order> {}
|
- 手动书写SQL,通过
User.id查询对应的Order
 1
 2
 3
 4
 5
 6
 7
 8
 9
10
11
12
13
|
@Mapper
public interface UserMapper extends BaseMapper<User> {
    @Select("select * from t_user")
    @Results( {
            @Result(column = "id", property = "id"),
            @Result(column = "username", property = "username"),
            @Result(column = "password", property = "password"),
            @Result(column = "id", property = "orders", javaType = List.class,
                    many = @Many(select = "com.example.quick_demo.mapper.OrderMapper.selectById")
            ),
    })
    List<User> SelectAllUserAndOrders();
}
|
- 最后调用方法即可。
分页查询
- 创建Mybatis配置类
 1
 2
 3
 4
 5
 6
 7
 8
 9
10
|
@Configuration
public class MybatisPlusConfig {
    @Bean
    public MybatisPlusInterceptor paginationInterceptor(){
        MybatisPlusInterceptor mybatisPlusInterceptor = new MybatisPlusInterceptor();
        PaginationInnerInterceptor paginationInnerInterceptor = new PaginationInnerInterceptor(DbType.MYSQL);
        mybatisPlusInterceptor.addInnerInterceptor(paginationInnerInterceptor);
        return mybatisPlusInterceptor;
    }
}
|
- 直接在Controller中使用Mapper的
selectPage方法即可
1
2
3
4
5
6
7
|
@GetMapping("/m2")
public IPage m2(){
    Page<User> page = new Page<>(0, 2);  // 0表示页数,2表示每页多少个
    IPage ipage = userMapper.selectPage(page, null);
    System.out.println(ipage);
    return ipage;
}
|
Vue快速上手
Vue 学习笔记 | Vue 基础 01 (wangyi.one)
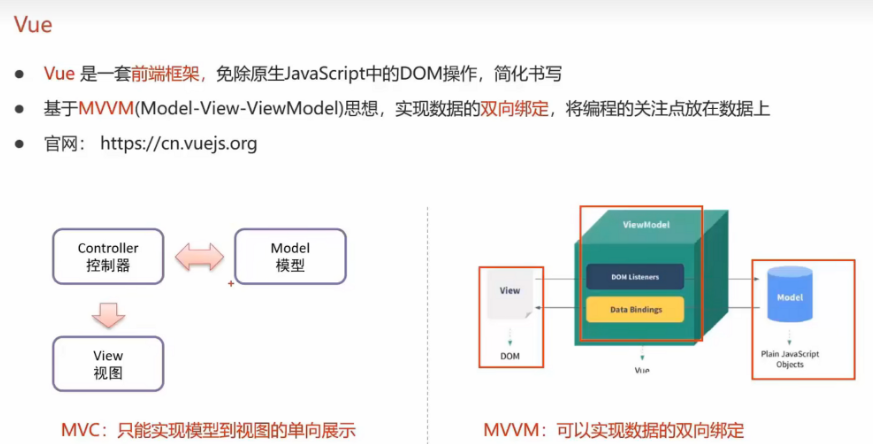
注意事项:
methods必须要加s
- 导入:
<script src="https://cdn.jsdelivr.net/npm/vue/dist/vue.js"></script>
- 导入Axios:
<script src="https://unpkg.com/axios/dist/axios.min.js"></script>
简单Vue程序
 1
 2
 3
 4
 5
 6
 7
 8
 9
10
11
12
|
<div id="app">
    {{ message }}
</div>
<script src="<https://cdn.jsdelivr.net/npm/vue/dist/vue.js>"></script>
<script>
    var app =new Vue({
        el:"#app",
        data:{
            message:"hello Vue!"
        }
    })
</script>
|
- el : 挂载点
- data: 数据,里面也可以放数组,对象等
vue指令
- v-text指令的作用:设置标签的内容
- v-html指令的作用是:设置元素的innerHTML
 1
 2
 3
 4
 5
 6
 7
 8
 9
10
11
12
13
|
<h2 v-text = "message">北京</h2>
<h2>{{ message+"!" }}深圳</h2>
<p v-html="content"></p>

<script>
   var app=new Vue({
       el:"#app",
       data:{
         message:"嘿嘿嘿",
         content:"<a href='<https://mp.csdn.net/console/home>'>黑马</a>"
       }
   })
</script>
|
v-on指令基础:点击就触发(单机、双击,按键)
 1
 2
 3
 4
 5
 6
 7
 8
 9
10
11
12
13
14
15
16
17
|
<button @click="sub">点击我</button>

<input type="text" @keyup.enter="sayHi">

<script>
   var app=new Vue({
       el:"#app",
       data:{
         num:1
       },
       methods:{
           sub:function(){
              console.log("sub");
           }
       }
   })
</script>
|
v-show、v-if指令:元素的显示与隐藏、v-if操作DOM树开销大
1
2
3
4
5
|
<img v-show="isShow" src="./1.jpg">
<img v-show="age>=18" src="./1.jpg">

<p v-if="true">我是一个p标签</p>
<p v-if="isShow">我是一个p标签</p>
|
v-bind指令:为元素绑定属性、需要动态的增删class建议使用对象的方式
1
2
|
<img :src="imgSrc" :title="imgTitle+'显示'" :class="isActive?'active':''" @click="toggleActive">
<img :src="imgSrc" :title="imgTitle+'显示'" :class="{active:isActive}" @click="toggleActive">
|
v-for指令:循环
1
2
3
4
5
6
|
<li v-for="(item,index) in arr" :title="item">
  {{ index }}{{ item }}
</li>
<li v-for="(item,index) in objArr">
  {{ item.name }}
</li>
|
v-model:双向绑定数据
1
2
3
4
5
6
7
8
9
|
<input type="button" v-model="message" />

<script>
var app=new Vue({
  el:"#app",
  data:{
    message:"沙丁鱼"
  },
</script>
|
关于HTML标签的使用
1
2
3
4
5
6
7
8
|
# 链接触发javascript
<a href="javascript:;" @click="changeCity('北京')">北京</a>

# audio使用
<audio v-bind:src="MusicUrl" ref="audio" controls autoplay loop @play="play" @pause="pause"></audio>

# video使用
<video v-bind:src="MvUrl" controls="controls"></video>
|
Vue组件化开发
Vue 学习笔记 | Vue 组件 (wangyi.one)
Vue 学习笔记 | Vue 脚手架 (wangyi.one)
组件(Component)是Vue.js最强大的功能之一。组件可以扩展HTML元素,封装可重用的代码。 Vue的组件系统允许我们使用小型、独立和通常可复用的组件构建大型应用。
安装
- node安装
- 下载:https://nodejs.org/en/
- 全局配置
 1
 2
 3
 4
 5
 6
 7
 8
 9
10
11
|
# 在安装目录下创建node_global和node_cache
npm config set prefix "D:\\nodejs\\node_modules\\node_global"
npm config set cache "D:\\nodejs\\node_modules\\node_cache"
# 判断是否安装成功
npm config get prefix
npm config get cache

# 配置镜像
npm config set registry <http://registry.npm.taobao.org>
# 安装vue-cli
npm install vue-cli -g
|
创建项目
1
|
vue create 名字 # 新手选择vue3,然后把eslint去掉
|


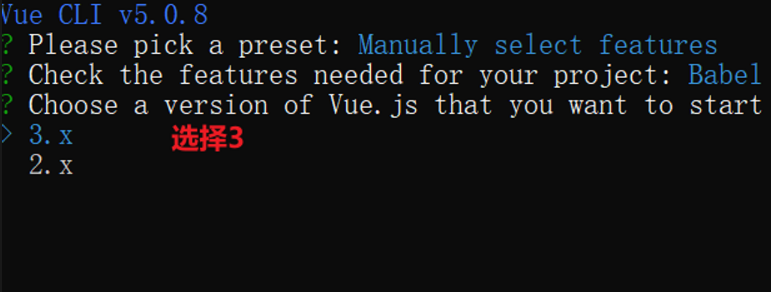

最后一个输入n
项目目录
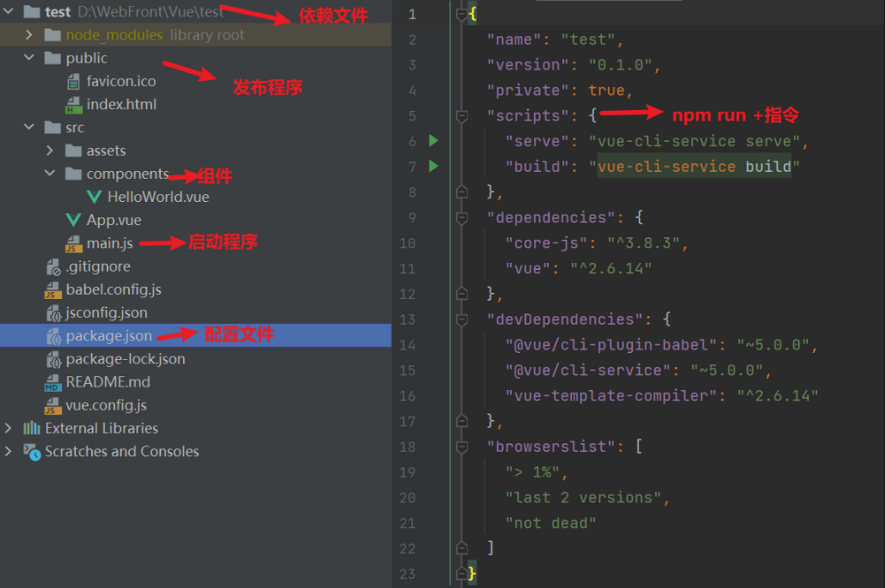
- 启动项目:
npm run serve
- 安装所有依赖:
npm install
创建新组件
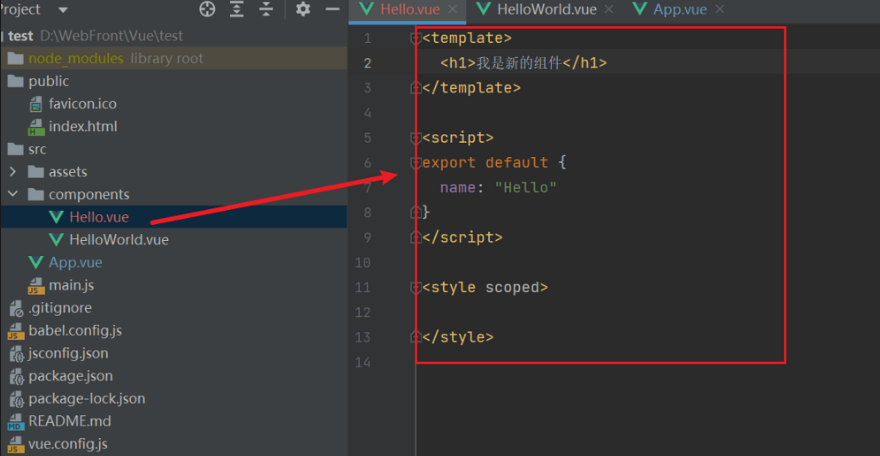
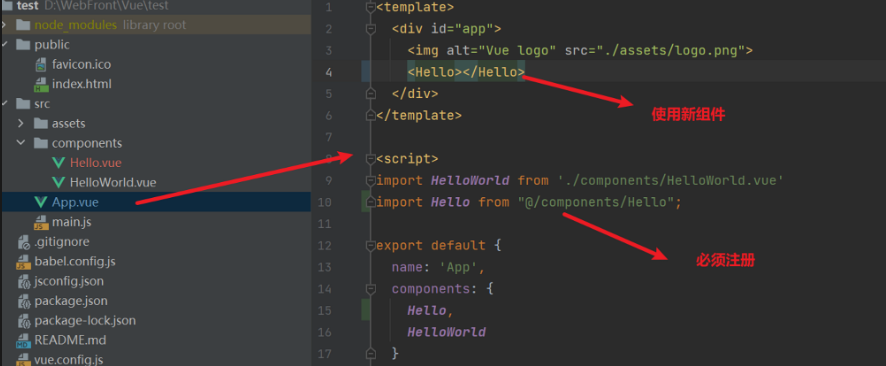
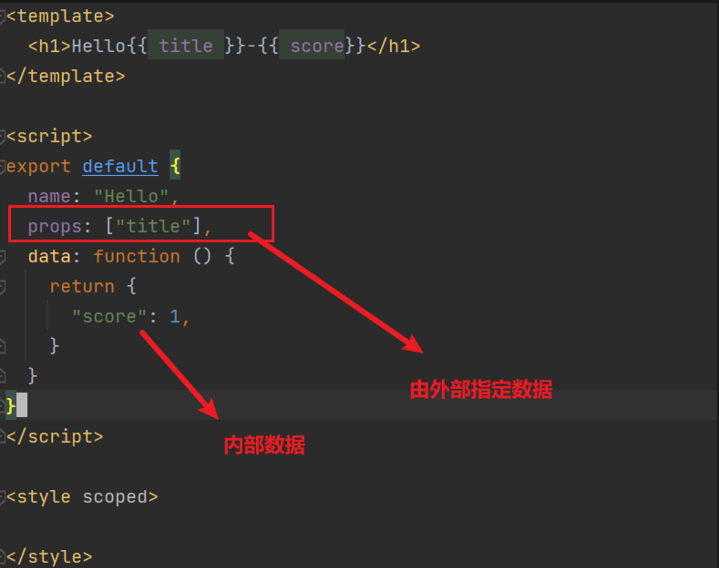

 1
 2
 3
 4
 5
 6
 7
 8
 9
10
11
12
13
14
15
16
17
18
19
20
21
22
23
24
25
26
|
<template>
    <h1>Hello{{ title }}-{{ score}}</h1>
</template>

<script>
    export default {
        name: "Hello",
        props: ["title"],
        data: function () {
            return {
                "score": 1,
            }
        }
    }
</script>

<style scoped>

</style>

<template>
    <div id="app">
        <img alt="Vue logo" src="./assets/logo.png">
        <Hello title="标题"></Hello>
    </div>
</template>
|
Element-UI
导入使用
Element - The world’s most popular Vue UI framework
1
2
3
4
5
6
|
<!-- Vue -->
<script src="<https://cdn.jsdelivr.net/npm/vue/dist/vue.js>"></script>
<!-- 引入样式 -->
<link rel="stylesheet" href="<https://unpkg.com/element-ui/lib/theme-chalk/index.css>">
<!-- 引入组件库 -->
<script src="<https://unpkg.com/element-ui/lib/index.js>"></script>
|
组件化开发使用
npm安装:npm i element-ui -S
全部导入:
 1
 2
 3
 4
 5
 6
 7
 8
 9
10
11
|
import Vue from 'vue';
import ElementUI from 'element-ui';
import 'element-ui/lib/theme-chalk/index.css';
import App from './App.vue';

Vue.use(ElementUI);

new Vue({
    el: '#app',
    render: h => h(App)
});
|
如何使用?
只需要新创建一个组件,从官网上复制即可:
 1
 2
 3
 4
 5
 6
 7
 8
 9
10
11
12
13
14
15
16
17
|
<template>
    <el-switch
        v-model="value"
        active-color="#13ce66"
        inactive-color="#ff4949">
    </el-switch>
</template>

<script>
    export default {
        data() {
            return {
                value: true
            }
        }
    };
</script>
|
Axios使用
Axios
Axios可以用来异步发起Request请求来获取数据
CDN应用axios
- axios回调函数中this指向改变了,需要额外的保存一份
 1
 2
 3
 4
 5
 6
 7
 8
 9
10
11
12
13
14
15
16
17
18
19
20
21
22
23
24
|
<script src="<https://unpkg.com/axios/dist/axios.min.js>"></script>

// axios.get(地址?key=value&key2=values).then(function(response){},function(err){})
// 示例
search : function(){
    var that = this;
    axios.get("<https://autumnfish.cn/search?keywords=>" + this.keyword).then(function(response){
        console.log(response)
        that.music_arr = response.data.result.songs
    }, function(err){
        console.log(err)
    })
},

    // axios.post(地址,{key:value,key2:value2}).then(function(response){},function(err){})
    // 示例
    Mpost : function(){
        axios.post("<https://autumnfish.cn/api/user/reg",{username:"222阿香3>"})
            .then(function(response){
            console.log(response);
        },function(err){
            console.log(err);
        })
    },
|
组件化应用
npm 安装:npm install axios
箭头函数继承了父级的作用域,所以可以不用var that=this了
Axios与Vue结合:
1
2
3
4
5
6
7
8
9
|
// main.js
import axios from "axios"
axios.defaults.baseURL = "<http://localhost:8080>"  // 配置请求根路径
Vue.prototype.$http = axios  // Axios绑定在Vue上面

// 在组件中使用Axios
this.$http.get("db/user").then((resp) =>{
    console.log(resp)
})
|
解决跨域问题直接在SpringBoot的控制器上加@CrossOrigin注解
Vue-Router
Vue 学习笔记 | 路由 (wangyi.one)
Vue路由vue-router是官方的路由插件,能够轻松的管理 SPA 项目中组件的切换。 Vue的单页面应用是基于路由和组件的,路由用于设定访问路径,并将路径和组件映射起来
vue-router 目前有 3.x 的版本和 4.x 的版本,vue-router 3.x 只能结合 vue2 进行使用,vue-router 4.x 只能结合 vue3 进行使用
安装:npm install vue-router@3/4
快速上手
在router/index.js初始化router
 1
 2
 3
 4
 5
 6
 7
 8
 9
10
11
12
13
14
15
16
|
import VueRouter from "vue-router";
import Vue from "vue";
import Book from "@/components/Book";
import Music from "@/components/Music";

// 将VueRouter设置为Vue的插件
Vue.use(VueRouter)

const router = new VueRouter({
    routes: [
        {path:'/book', component: Book},
        {path:'/music', component: Music},
    ]
})

export default router
|
在main.js中导入router
1
2
3
4
5
|
import router from "@/router";
new Vue({
    render: h => h(App),
    router: router,
}).$mount('#app')
|
在其他文件中使用router
1
2
3
4
5
6
7
|
<template>
    <!--声明路由链接-->
    <router-link to="/book">书</router-link>
    <router-link to="/music">音乐</router-link>
    <!--声明路由占位符标签-->
    <router-view></router-view>
</template>
|
嵌套路由
只需要在一个路由后面加上children即可。
1
2
3
4
|
{path: '/book', component: Book, children: [
    {path: 'java', component: Java},
    {path: 'python', component: Python},
]},
|
Book组件中,必须也要有router-view
1
2
3
4
5
6
7
8
|
<template>
    <div>
        <h1>我是Book</h1>
        <router-link to="/book/java">java</router-link>
        <router-link to="/book/python">python</router-link>
        <router-view></router-view>
    </div>
</template>
|
如果没有的话,一个router-view是不可以渲染两个组件的,导致只能看到父亲组件
动态路由
就比如/image/1这样的路由,1是图片的id
1
2
3
4
5
6
|
<!--声明路由链接-->
<router-link to="/book">书</router-link>
<router-link to="/music">音乐</router-link>
<router-link to="/image/1">图片</router-link>
<!--声明路由占位符标签-->
<router-view></router-view>
|
router定义
1
2
3
4
5
6
|
const router = new VueRouter({
    routes: [
        {path:'/music', component: Music},
        {path:'/image/:id', component: Image}
    ]
})
|
组件中拿到id
1
2
3
|
<template>
    <h1>我是Image {{ $route.params.id }}</h1>
</template>
|
开启prop传递参数,方便我们更好的拿到参数
 1
 2
 3
 4
 5
 6
 7
 8
 9
10
11
|
{path:'/image/:id', component: Image, props:true}
<template>
    <h1>我是Image {{ id }}</h1>
</template>

<script>
    export default {
        name: "Image",
            props: ["id"]
    }
</script>
|
 1
 2
 3
 4
 5
 6
 7
 8
 9
10
|
<template>
    <h1>我是Image {{ id }}</h1>
</template>

<script>
    export default {
        name: "Image",
            props: ["id"]
    }
</script>
|
VueX
Vue 学习笔记 | Vuex (wangyi.one)
安装 | Vuex
对于组件化开发来说,大型应用的状态往往跨越多个组件。在多层嵌套的父子组件之间传递状态已经十分麻烦,而Vue更是没有为兄弟组件提供直接共享数据的办法。
每一个 Vuex 应用的核心就是 store(仓库)。“store”基本上就是一个容器,它包含着你的应用中大部分的状态 (state)
安装:npm install vuex@3 --save
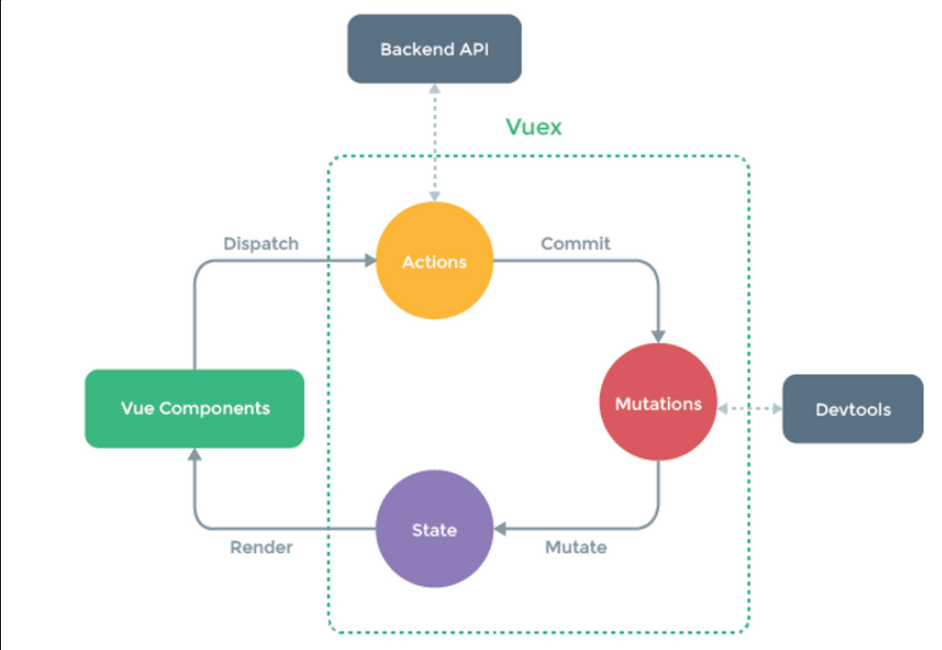
在store/index.js初始化vuex
 1
 2
 3
 4
 5
 6
 7
 8
 9
10
11
12
13
14
15
|
import Vue from 'vue'
import Vuex from 'vuex'

Vue.use(Vuex)

const store = new Vuex.Store({
    state: {
        count: 0
    },
    mutations: {
        increment (state) {
            state.count++
        }
    }
})
|
在main.js导入vuex
 1
 2
 3
 4
 5
 6
 7
 8
 9
10
|
import Vue from 'vue'
import App from './App.vue'
import store from "@/store";

Vue.config.productionTip = false

new Vue({
    render: h => h(App),
    store: store,
}).$mount('#app')
|
在组件中使用
 1
 2
 3
 4
 5
 6
 7
 8
 9
10
11
12
13
14
15
16
17
|
<template>
    <div id="app">
        {{ this.$store.state.count }}
        <button @click="add">加一</button>
    </div>
</template>

<script>
    export default {
        name: 'App',
            methods: {
                add() {
                    this.$store.commit("increment")
                }
            }
    }
</script>
|
简化this.$store.state
 1
 2
 3
 4
 5
 6
 7
 8
 9
10
11
12
13
14
15
16
17
18
19
20
|
<template>
    <div id="app">
        {{ count }}
        <button @click="add">加一</button>
    </div>
</template>

<script>
    import {mapState} from 'vuex';

    export default {
        name: 'App',
            computed: {
                ...mapState([
                    // 将this.$store.state.count 映射为 count
                    'count',
                ])
            },
    }
</script>
|
对于一个列表,我们可以只想要获取其中done属性为true的元素,因此我们需要设置getter,通过mapGetter简化getter
 1
 2
 3
 4
 5
 6
 7
 8
 9
10
11
12
13
14
15
16
17
18
19
20
|
import Vue from 'vue'
import Vuex from 'vuex'

Vue.use(Vuex)

const store = new Vuex.Store({
    state: {
        todos: [
            {id: 1, text: '...', done: true},
            {id: 2, text: '...', done: false}
        ]
    },
    getters: {
        doneTodos: state => {
            return state.todos.filter(todo => todo.done)
        }
    },
})

export default store
|
 1
 2
 3
 4
 5
 6
 7
 8
 9
10
11
12
13
14
15
16
17
18
19
20
|
<template>
    <div id="app">
        {{ doneTodos }}
        <button @click="add">加一</button>
    </div>
</template>

<script>
    import {mapState, mapGetters} from 'vuex';

    export default {
        name: 'App',
            computed: {
                ...mapGetters([
                    // 将this.$store.getter.doneTodos 映射为 doneTodos
                    'doneTodos',
                ])
            },
    }
</script>
|
简化Mutations
 1
 2
 3
 4
 5
 6
 7
 8
 9
10
|
import { mapMutations } from 'vuex'

methods: {
    ...mapMutations([
        // 将 `this.increment()` 映射为 `this.$store.commit('increment')`
        'increment',
        // `mapMutations` 也支持载荷:
        'incrementBy' // 将 `this.incrementBy(amount)` 映射为 `this.$store.commit('incrementBy', amount)`
    ]),
}
|
MockJs
Mock.js 是一款前端开发中拦截Ajax请求再生成随机数据响应的工具,可以用来模拟服务器响应,优点是非常简单方便, 无侵入性, 基本覆盖常用的接口数据类型。 支持生成随机的文本、数字、布尔值、日期、邮箱、链接、图片、颜色等。
安装:npm install mockjs
在项目中创建mock目录,新建index.js文件
 1
 2
 3
 4
 5
 6
 7
 8
 9
10
11
12
13
14
15
|
import Mock from "mockjs"

Mock.mock('/search', {
    "ret": 0,
    "data": {
        // 生成随机日期
        "mtime": "@datetime",
        // 生成随机数组1-800
        "score|1-800": 1,
        // 生成随机中文名字
        "nickname": "@cname",
        // 生成图标
        "img": "@image('200x100', '#ffcc33', '#FFF', 'png', 'Github')"
    }
})
|
在main.js中导入mock
拦截/search?id=1这样带参数的路由,需要在拦截的地方,加上正则表达式
1
2
3
4
5
6
7
|
import Mock from "mockjs"

Mock.mock(RegExp('/search.*'), {
    "ret": 0,
    "data": {
    }
})
|
官网生成文档:
Syntax Specification · nuysoft/Mock Wiki


